
To Documentation Index
Art-of-Illusion modelling tutorial
A Wooden Die
By Duncan H, September 2001.
(For AoI version 0.9)
 The aim of this tutorial is as a basic introduction to modelling with Boolean differences. It is not intended as full guide to 3D modelling. If you have not tried out the Hourglass Tutorial I recommend you at least take a look at that first.
As we progress through the tutorial you will be shown how to create a basic cube with spheres removed to make the dots for numbers. Here is a list of Boolean operations:-
Difference This subtracts 1 shape from another leaving a 'hole' the same shape of the item subtracted.
Intersection This removes everything except the parts of the 2 objects that are overlapping.
Union This adds the 2 objects together creating 1 single object. Details that are 'inside' the other object are effectively lost.
In this tutorial we will be concentrating on Difference only although the principles are the same for all of them.
The aim of this tutorial is as a basic introduction to modelling with Boolean differences. It is not intended as full guide to 3D modelling. If you have not tried out the Hourglass Tutorial I recommend you at least take a look at that first.
As we progress through the tutorial you will be shown how to create a basic cube with spheres removed to make the dots for numbers. Here is a list of Boolean operations:-
Difference This subtracts 1 shape from another leaving a 'hole' the same shape of the item subtracted.
Intersection This removes everything except the parts of the 2 objects that are overlapping.
Union This adds the 2 objects together creating 1 single object. Details that are 'inside' the other object are effectively lost.
In this tutorial we will be concentrating on Difference only although the principles are the same for all of them.
Getting Started
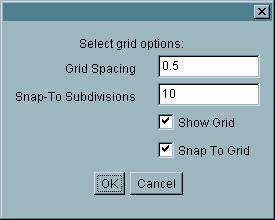 1. Begin with a new scene after starting AoI and set up a grid backround by going to Scene -> Grids Set Grid Spacing to 0.5 and tick Show Grid and Snap to Grid. Then go to Scene -> Display mode and change to Wireframe 1. Begin with a new scene after starting AoI and set up a grid backround by going to Scene -> Grids Set Grid Spacing to 0.5 and tick Show Grid and Snap to Grid. Then go to Scene -> Display mode and change to Wireframe
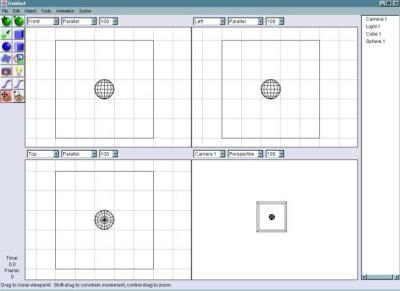 2. Select the cube tool and create a cube 5 x 5 grid squares in the top left viewing pane (Front). Be careful when doing this to keep the edges of the cube on the grid squares. When the cube has been created make sure it is highlighted in the object list and go to Object -> Object Layout. The X,Y,Z sizes should all be 2.5. If not adjust them now. 2. Select the cube tool and create a cube 5 x 5 grid squares in the top left viewing pane (Front). Be careful when doing this to keep the edges of the cube on the grid squares. When the cube has been created make sure it is highlighted in the object list and go to Object -> Object Layout. The X,Y,Z sizes should all be 2.5. If not adjust them now.
3. In the Front view, on the center square of the cube, create a sphere the size of 1 grid square. This will become the 'stamp' we make the dots with. With Sphere 1 selected in the object list go to Object -> Object Layout and make sure the X,Y,Z sizes are all 0.5. If not set them now.
4. Move the sphere down in the top view until it sits halfway across the lower line of the cube, and is in the center of the grid squares. This will become the number 1 dot.
 5. In the Object List select Cube 1 then hold shift and select Sphere 1. Both are now highlighted.
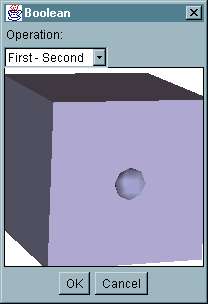
Go to Tools -> Boolean Modeling. This will show a basic render of the 2 objects we have selected. In the drop down select First - Second. This will subtract the second highlighted object in the object list from the first one. You can drag the object in the preview window around to see how a hole has now been 'cut' out of the cube. If the hole you have cut doesn't look like the sphere but looks as though the interior of the cube is
hollow then you must cancel the boolean modeling window and move the sphere very slightly off of the edge of the cube so it doesn't sit exactly central. Now try the boolean modeling window again and you should see the hole has been correctly cut.
When you are happy with the first of the number dots click OK to complete the boolean difference. The program will now create a new object called Boolean 1 and offset it slightly from the original. To prevent confusion we will delete the original, Cube 1, and just leave Sphere 1 and Boolean 1. To do this select Cube 1 in the object list and press Delete on your keyboard. 5. In the Object List select Cube 1 then hold shift and select Sphere 1. Both are now highlighted.
Go to Tools -> Boolean Modeling. This will show a basic render of the 2 objects we have selected. In the drop down select First - Second. This will subtract the second highlighted object in the object list from the first one. You can drag the object in the preview window around to see how a hole has now been 'cut' out of the cube. If the hole you have cut doesn't look like the sphere but looks as though the interior of the cube is
hollow then you must cancel the boolean modeling window and move the sphere very slightly off of the edge of the cube so it doesn't sit exactly central. Now try the boolean modeling window again and you should see the hole has been correctly cut.
When you are happy with the first of the number dots click OK to complete the boolean difference. The program will now create a new object called Boolean 1 and offset it slightly from the original. To prevent confusion we will delete the original, Cube 1, and just leave Sphere 1 and Boolean 1. To do this select Cube 1 in the object list and press Delete on your keyboard.
6. As you can see the die (Boolean 1) is now no longer in the same position as we started at. To make it easier to line up drag the die back to the same position it was in originally. Don't worry too much if it isn't in exactly the same place.
 7. Now we need to repeat steps 4 and 6 to create the other number dots on each face of the die.
Start by moving Sphere 1 over to the left edge of the die in the top view and place it in the 2nd square from the bottom again halfway over the edge of the die. Then in the left view move it down by 1 square. Sphere 1 should now be in the correct position to create the first dot of the number 3. Create the boolean difference exactly the same way as shown in step 5 except this time use Second - First as the object Boolean 1 is now after Sphere 1 in the object list. 7. Now we need to repeat steps 4 and 6 to create the other number dots on each face of the die.
Start by moving Sphere 1 over to the left edge of the die in the top view and place it in the 2nd square from the bottom again halfway over the edge of the die. Then in the left view move it down by 1 square. Sphere 1 should now be in the correct position to create the first dot of the number 3. Create the boolean difference exactly the same way as shown in step 5 except this time use Second - First as the object Boolean 1 is now after Sphere 1 in the object list.
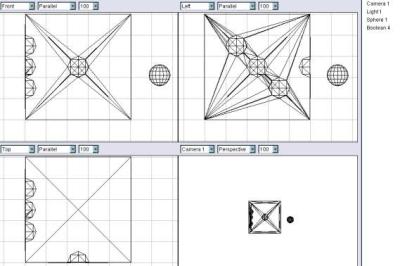
8. After you have created the object boolean 2 you can delete Boolean 1 and move the new object back to where it should be. In the left view again, move Sphere 1 to the center square and create the next hole there. Again delete the old object and move the new one back to the correct position. Now for the last dot place Sphere 1 in the top left corner of Boolean 3 using the left viewing pane and create the next hole. After deleting the old object you should have Sphere 1 and Boolean 4 looking like this.
9. Now to complete the last face of the die with 2 more Boolean differences to create number 2. We could carry on and do all the faces but for this picture that isn't necessary as we will only be able to see 3. To do all the faces would also take a lot longer and create many more polygons therefore possibly slowing the program.
10. For the final face move Sphere 1 to the 2nd square from the left and top in the top view. In the front view move the sphere up so it is halfway across the edge of the die as done previously. Create the next hole in the same manner as previously done. Once the old Boolean 4 has been removed and Boolean 5 has been placed back in the correct position align Sphere 1 in the oposite corner of the top view and complete the final hole. You may want to save your work so far so you don't lose it.
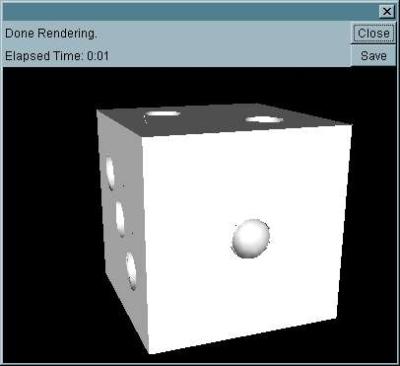 11. Once Boolean 5 and Sphere 1 have been deleted the basic die has been created. Now we can move the camera around it to get the best viewing position and adjust the light to get the best illumination and add texture to the die. While doing this we can use the basic Raster render to see how our picture is coming along.
The best way I have found so far for moving the camera and lights around is to zoom out on the top view down to 10% so you can see everything. Then select either the camera or light in the object list and move it to the rough position you want in the top view. Then zoom out on the left view until you can see the camera/light and can now adjust the height and tilt. Keep looking in the camera view window to see what your picture looks like as you make changes. 11. Once Boolean 5 and Sphere 1 have been deleted the basic die has been created. Now we can move the camera around it to get the best viewing position and adjust the light to get the best illumination and add texture to the die. While doing this we can use the basic Raster render to see how our picture is coming along.
The best way I have found so far for moving the camera and lights around is to zoom out on the top view down to 10% so you can see everything. Then select either the camera or light in the object list and move it to the rough position you want in the top view. Then zoom out on the left view until you can see the camera/light and can now adjust the height and tilt. Keep looking in the camera view window to see what your picture looks like as you make changes.
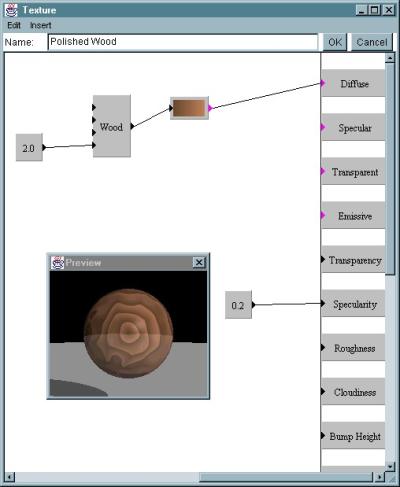 12. Once you are happy with the camera angle and reasonably happy about the light then it is time to start adding texture to your object. For mine I have used a wood texture with the following settings in the texture builder. A fixed number of 2 has been added to the noise input of the wood texture to make the rings of wood even more random. The custom colour function has just 2 points one set to dark brown and the other a lighter brown.
A fixed value of 0.2 has been added to Specularity to make the wood shiny as if it has been polished. You can play around with these values to get the effect that you want.
Once you have created your texture then add it to the die and adjust the settings untill you are happy with how the texture looks in the preview window. 12. Once you are happy with the camera angle and reasonably happy about the light then it is time to start adding texture to your object. For mine I have used a wood texture with the following settings in the texture builder. A fixed number of 2 has been added to the noise input of the wood texture to make the rings of wood even more random. The custom colour function has just 2 points one set to dark brown and the other a lighter brown.
A fixed value of 0.2 has been added to Specularity to make the wood shiny as if it has been polished. You can play around with these values to get the effect that you want.
Once you have created your texture then add it to the die and adjust the settings untill you are happy with how the texture looks in the preview window.
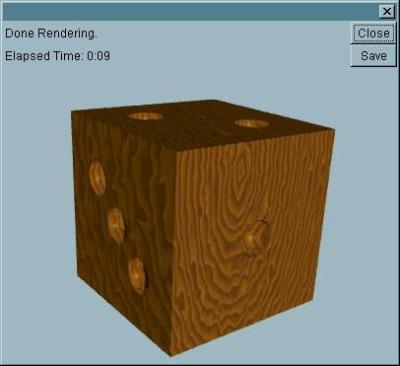 13. The final test render of the die should look something like this. To make this look even better you could try adding smooth edges like the picture at the top of the page. To get that effect follow the exact same instructions as you have here except before
creating the first boolean difference convert Cube 1 to a triange mesh and adjust the points and edges to give nice curved edges. This however is a whole new tutorial so I will leave it at that for you to experiment with. You may also like to add another cube object underneath the die to act as a surface for it to
sit on. Again you can make this however you like, I have used a marble type effect by playing around in the texture builder, and to finish it all off completed the picture with a raytraced render with all options ticked except depth of field. Again the different methods of rendering are a whole tutorial in themselves so try playing around and see what works for you. 13. The final test render of the die should look something like this. To make this look even better you could try adding smooth edges like the picture at the top of the page. To get that effect follow the exact same instructions as you have here except before
creating the first boolean difference convert Cube 1 to a triange mesh and adjust the points and edges to give nice curved edges. This however is a whole new tutorial so I will leave it at that for you to experiment with. You may also like to add another cube object underneath the die to act as a surface for it to
sit on. Again you can make this however you like, I have used a marble type effect by playing around in the texture builder, and to finish it all off completed the picture with a raytraced render with all options ticked except depth of field. Again the different methods of rendering are a whole tutorial in themselves so try playing around and see what works for you.
That brings us to the end of this tutorial. Please remember that this is only a very small part of the program and there are lots of features for you to explore and play around with. The most important thing of all though is to have fun :-)
Boolean difference Tutorial by Duncan H

|
