The best approach would be UV mapping where image maps are used and are mapped to specific points on the mesh. However the UV mapping facility in Art of Illusion is under development and is currently tricky to use. All is not lost, however; there is a way to get the effect we need using a combination of image mapping and procedural textures or layered textures. The idea is to create 2 image maps; one for each side of the hand - that gives us the control over which bits of the texture go where. Then we're going to look at 2 options to control which map gets applied to which bit of the hand.
You will need access to a reasonably capable 2D paint program; I use Paintshop Pro but The Gimp would be able to do this just as well if you want a free alternative.
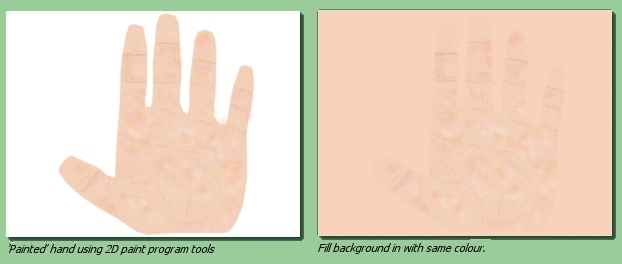
Basically, then, we're going to use image maps to create the texture. This allows us to paint features at the right places. The first thing we need is a 'blank canvas', i.e. an image of the outline of the hand object onto which we can paint. This can be done by selecting the 'Front view' window and switching to One View (Scene -> One View). Make sure the window is set to Parallel view and change the zoom of the window until the hand fills it. Then use your 2D paint program to screen capture the rectangular region enclosing the hand as shown below left.
We now need to select the hand outline. One way to do this is to use the 'magic wand' facility available in many 2D paint programs; select the background with it, then invert the selection to effectively select the hand. Set the background colour to a suitable skin tone and then <delete> to replace the shaded hand colour with the flat skin tone as shown below right:

Now we have a suitable starting point for painting our texture. Now comes the artistic bit; use whatever 2D paint tools you want to paint a realistic image of the hand. My attempt is shown below left (trust me - it looks better full size!). I used the airbrush tool mainly for the generally blotchy colouring and a thin paintbrush for the wrinkles and lines. I then added some noise to the image and applied Gaussian smoothing to blend the noise in.
Now, when we come to map the images to the hand, we're going to have problems between the fingers. Although we'll have a image for the palm of the hand and an image for the back, inbetween will take on the colour of the imagemap outside the hand region (believe me, I tried it!). So the trick is to make this outside colour blend in. Use the 'magic wand' tool to select the background and fill it with a suitable skin tone. You could add some other paint effects if you like but I'm hoping people aren't going to look too closely between the fingers. The background adjusted image is shown below right:
Now, we need to repeat the whole procedure with the back of the hand. When done, you will need to mirror this 'back' image about the vertical axis; it's just something you need to do to make the mapping work correctly. Save both images as either .jpg or .png.
|
OK, now we have the 2 imagemaps for the back and the palm of the hand. To actually apply them to the
mesh object, we have 2 options: using procedural textures or using layered textures. The latter is
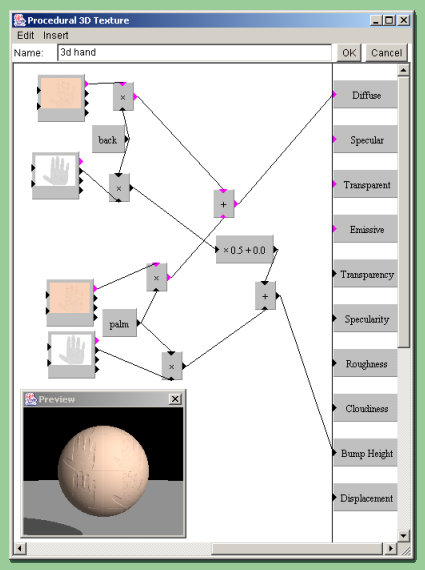
probably slightly easier but, for education sake, I have presented both. Procedural Texture Approach To set up the procedural texture, go to Scene -> Textures, select New, give it a name and select a Procedural 3D texture. This will open up the procedure editor dialogue window which will eventually look like that on the right: Now the basic premise here is to control which of the 2 images gets mapped to which bit of the hand. The way to control this is through texture parameters. In case you don't know, you can assign points in a mesh with a specific value of a texture parameter thereby controlling how the texture looks at that point. Quite simply, we're going to have 2 parameters called back and palm. back is going to be equal to 1 on the back of the hand and 0 on the palm and palm is going to be the opposite. First, let's get the images into the texture. Select Insert -> Patterns -> Image and double-click on the module that appears. This will display a dialogue allowing various image parameters to be set. Just click on the blank square at the top to select an image. This takes you to another dialogue where you need to click Load. Select the image of the back of the hand and click on Done and then OK to get back to the main procedure editor window. The image module will now show a thumbnail version of the image. We want this image to be mapped fully to areas of the mesh where back is equal to 1 and not mapped at all where back is equal to 0. So, all we need to do is multiple the image by back. Select Insert -> Color Functions -> Scale to add a Scale module. This has a colour input (pink) and a number input (black) and a single colour output. Plug the colour output from the image module into the colour input of the scale module, and the output from the parameter module back into the number input of the scale module. Now wherever the value of back is 1, the image remains unchanged and where it equals 0, the image will be black (colour equivalent of 0). Repeat this whole thing now with the palm parameter module and the palm imagemap. Now we need to add the outputs of the 2 scale modules together and feed the sum into the Diffuse as shown on the right. So, for a point on the palm, palm equals 1 and back equals 0 giving an unchanged palm imagemap and a black back imagemap; the sum of these is the palm map and vice versa. I have done one other thing in the texture on the right and that is to add bump mapping for added realism. I created greyscale versions of the palm and back imagemaps and smoothed them. I have then created 2 new image modules with these images and, using the same principle as above, mapped the bumps to the correct side of the hand (there is also a bit of scaling to get the bumps the right 'height'). |
 |
The texture is now complete. All we need to do now is map the texture to the hand and assign the points in the hand mesh with the appropriate parameter values. First, select the hand object in the Object List, click right and select Set Texture. Choose the texture we've just made and you will see the Object Texture dialogue. In the Texture Parameters section, you should see the 2 parameters we set up. Check both 'Per Vertex' boxes to allow the values to be controlled by the mesh editor. Then click on Edit Mapping. In the dialogue that comes up, you will need to alter the x and y scaling and centering to fit the imagemaps to the hand. Note only one of the imagemaps will be displayed in this dialogue for both sides. Don't worry, if you fit this to the hand properly, the other map will take care of itself. You will also need to select the Bind Texture Coordinates to Surface option in the Edit Mapping dialogue. This will ensure that the texture is 'stuck' to the mesh which is very important for the animation part.
When done, click OK and return to the main display. We have now assigned and fitted the texture to the hand - we just need to assign the texture parameters. Double-click the hand object in the Object List to display the mesh editor again. Simply select the points on the palm side of the hand, select Mesh -> Texture Parameters and set back equal to 0 and palm equal to 1. Then select the remaining points on the back side of the hand and set back to 1 and palm to 0.
And finally, the texture is complete.
Layered Texture Approach
For this approach, we are going to create 2 separate image mapped textures (one for the palm and one for the back of the hand) and then use the layered texture facility to control which gets mapped where.
First, we need to set up the image mapped textures. Let's start with the palm. Go to Scene -> Textures, select New, give it a name (e.g. palm) and select Image Mapped from the texture types list. This brings up the image map dialogue (see manual for details). Click on the box immediately to the right of Diffuse Color to bring up the image map list. Click on 'Load', locate and select the image of the palm and click OK; this loads the image into the scene file and it now appears in the image list as a thumbnail. Click on 'Done' to select this image for the diffuse colour. Now we need to add the bump map; repeat the process that we performed for the Diffuse Color for the Bump Height property and selecting the bump map image of the palm we made earlier. To the right of the bump height image, enter a scaling value for the bump map; try 0.5 initially - you can always adjust it later.
Now create a new texture for the back of the hand by repeating the above for the back of hand image and bump map.
Now to assign the texture to the hand mesh. Select the mesh in the Object List, click right and select Set Texture to display the Object Texture dialogue. Choose Layered Texture from the drop down Type list at the top and the window will change to something similar to that shown below:
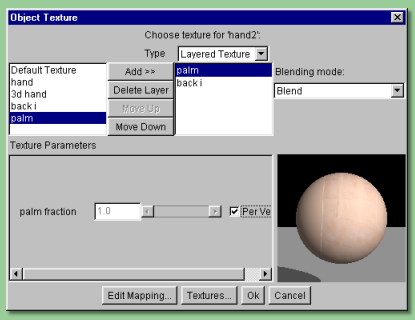
Select the 'back' texture from the list of currently-defined textures that will be displayed on the left. Then click on
Now, the mix of textures is controlled by the blending fraction of the top texture, i.e. 'palm'. If set to 1 then the 'palm' texture will be the only one seen, if set to 0 then the 'back' texture will show through completely; anywhere in between will produce a mix. We want that fraction to vary according to the position on the mesh - to be 1 on the palm and 0 on the back, so select the 'palm' entry in the layered textures list and click on the 'Per Vertex' box in the Texture Parameters section of the dialogue. That's it - click on 'OK' when finished
The last thing to do is define which points on the mesh have which values of the blending fraction. Double-click the hand mesh in the Object List to display the mesh editor. Select all the points on the back of the hand and select Mesh -> Texture Parameters . The following dialogue will be displayed:
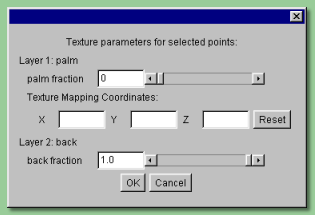
Enter 0 in the palm fraction box; this will effectively assign the 'back' texture to this part. The remainder of the mesh will be set to a palm fraction of 1 by default so we don't need to worry about that.
That's it.
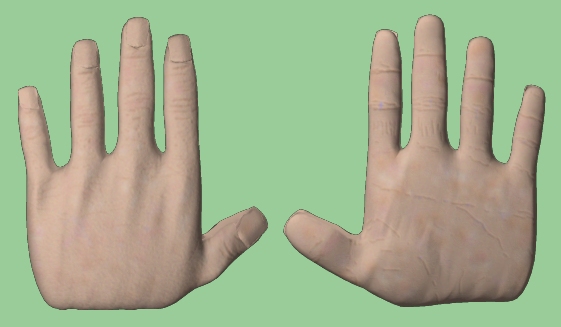
Below shows my attempts. You could take this further and define a slightly different texture for the nails, i.e. slight specularity etc. using texture parameters, but I'll leave that for another time.
Back to Contents