Previous: Modelling the Hand
Next: Adding a Texture
Back to Contents

Modelling, Texturing and Animating a Hand

by Julian MacDonald

Setting up the Skeleton


Having now created the triangle mesh model of the hand, it is time to create a skeleton for it. For the purposes of animating the hand, we're going to have to set up a range of poses or 'gestures' for the hand and using a skeleton makes this task much easier as you will see later.

Double-click the hand object in the Object List to bring up the triangle mesh editor. Now it's time to set up the bones of the skeleton. A tip when drawing and manipulating skeletons is to go into edge editing mode and select all - the only point of this is that it hides the vertices and makes the mesh pink thereby making the position of the bones much clearer. I find this especially useful for complex meshes.

Click on the skeleton tool icon We're going to create a bone chain for each digit and we'll start with the first finger. We want the 'root' of the bone chain to be at the palm end, so press ctrl and click near the centre of the palm to define the root. Then ctrl click over the base of the first finger. The two points will be joined with a bone depicted with a kite shape as shown below. Now ctrl again over the next joint up and the next and finally near the tip of the finger as shown below.


Now, for the next finger. First click away from the bone to deselect the last point (otherwise the next ctrl click will join onto the end of the first finger). Then ctrl click again near the centre of the palm and proceed up the second finger the same as the first. Repeat for all fingers and the thumb (don't forget the thumb only has 2 bones in it). The final result should be as below:
The next thing to do is to actually attach the skeleton to the mesh. To do this, select all the vertices (Edit -> Select All) and select Skeleton -> Bind Points to Skeleton.

You will be prompted for a value for IK Weight Blending. IK stands for Inverse Kinematics and refers to the way that the bones towards the root end of the bone automatically follow bones further up the chain. IK Weight Blending defines the way that vertices are anchored to bones. See the tutorial on triangle meshes and the manual for more details of this. The default value of 0.5 will probably be OK as a starting point so accept this.

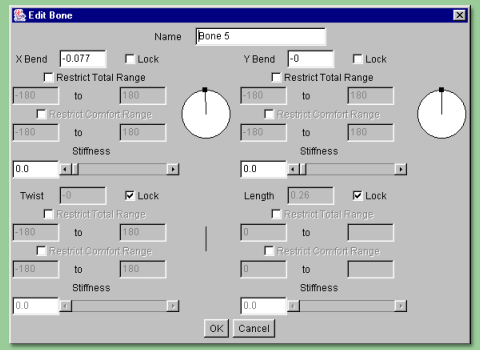
>From now on, if you move the skeleton, the mesh will move along with it. Try it - save the file first, then activate the skeleton tool by clicking on the skeleton icon. Click on the endpoint of a bone and drag it. The mesh will follow the bone. However you may notice a problem - there is no control over where the bones are going. We need to restrict the bones' movement to produce a more realistic and controllable skeleton.

Let's start with the first finger again. Click on the bone end at the fingertip to select it and select Skeleton -> Edit Bone . This will bring up the dialogue box shown on the right:

There are 4 main parameters here that can be controlled: X-bend, Y-bend, Twist and Length. The X-bend and Y-bend control the way the bone rotates about the joint at the root end of the bone (the narrower end of the 'kite'), i.e. they affect the side to side and back to front movements. The Twist parameter is effectively the z-bend in that in controls 'spin' around the joint. The last parameter, Length allows the bone to stretch or compress along its length. Note that both Twist and Length have the Lock option ticked by default. This means that these operations are prohibited. To enable them, simply untick the boxes. However, since fingers cannot twist or lengthen, we'll leave them as they are.

Now, I don't know about your hand, but the first 2 joints in my fingers do not allow any sideways movement (X-bend), only movement backwards and forwards (Y-bend). So, click on the Lock tickbox to lock the X-bend. Now onto the backwards and forwards movement: The bone in the tip of my fingers doesn't bend very readily until the finger is curled right over at which point it can bend through about 90 degrees with respect to the next bone. There is no movement at all in the reverse direction. So, under the Y-Bend click on Restrict Total Range and enter the values 0 (for no backward movement) and 90 (for 90 degree forward motion). Because this movement doesn't occur until the finger is curled over, I suggest putting a Stiffness value in as well - say 0.5.
Click on OK to set these values. Then select the next joint down and bring up the dialogue for that bone. Again, this bone cannot move sideways with respect to the 3rd finger bone so lock the X-bend. Also, as before, the bone cannot bend backwards so the minimum is again 0. Forward motion is perhaps marginally greater than the previous bone, say about 100 degrees.

The 3rd finger bone does allow sideways movement, so here we can set a range for the X-bend as well as the Y-bend. Again, it's about a 90 degree movement forwards for the Y-bend (and maybe a small backward angle as well) and, say 10-20 degrees each way for the X-bend (so, set -10 and 10 for the range).

There is one bone left running from the base of the finger to the middle of the palm which we won't do anything with for the moment, but this bone could be used for more realistic deformations of the palm as the fingers move.

All we need now is to set up the joints in the other fingers in the same way and the skeleton is complete.


Previous: Modelling the Hand
Next: Adding a Texture
Back to Contents