|
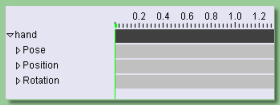
The numbers running along the top of the score are the times in seconds. |
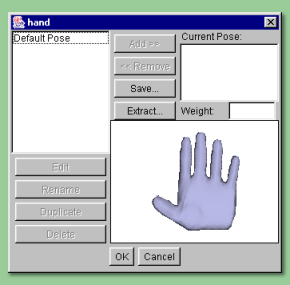 |
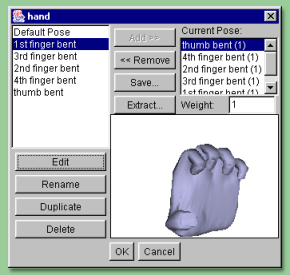
The box on the left of this dialogue is (or, at least, will be) a list of all the defined 'gestures' of
the mesh. Initially this consists solely of the Default Pose which is the hand mesh as created.
The box on the top right lists the 'gestures' which make up the current pose. There is a
subtle distinction between 'gestures' and 'poses'; a 'gesture' is a particular instance of the mesh.
A 'pose' is a combination of 'gestures'; in fact it is a weighted sum of the gestures as displacements from
the Default Pose. We'll see exactly what this means as we progress with this example. In this example I'm going to create an animation with the fingers closing and opening. The Default Pose is the hand with the fingers open so all we need to do is create a few gestures with the fingers closed. Because Poses are weighted sums of Gestures as displacements from the default pose, it is possible to create several gestures, say of each finger bent in turn, then add them to the Current Pose list. Indeed this makes better sense than creating a single gesture with all the fingers bent as we can individually control the bending of each finger. To create a new gesture, click on Default Pose in the gesture list and click on |
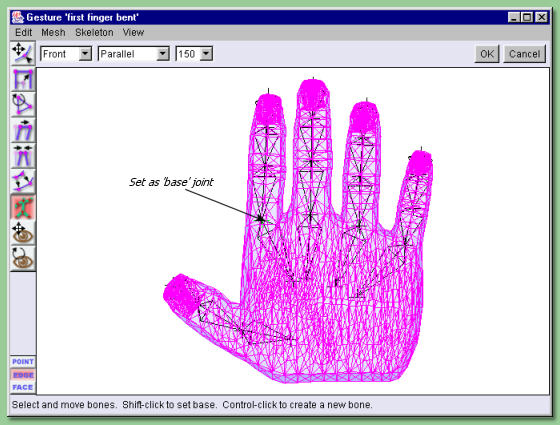 |
We're working on the first finger here and the idea is to bend the finger over. Before we start moving
anything, set the lower joint of the 3rd bone (the 4th cross down) as the base by <shift>
clicking it as shown on the left. This will stop any movement of bones lower down the chain. The
joint cross will turn green as shown. Now select the top joint by clicking on it - it will turn pink.
At this point, it is helpful to rotae the view so that we can see the side of the finger as below. Click
on the joint and drag it down to the right position as shown below: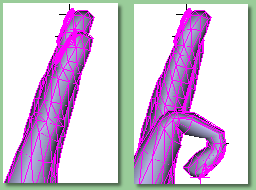 |
| This has successfully moved the finger to the required position but the finger has become slightly squashed around the joints as a result. It may be possible to remedy this by setting different values of IK Weight via the Edit Points tool but it is probably easier to manually edit the mesh to achieve a better look as shown on the right. This is simply a matter of using the mesh editing tools to move the vertices to better positions. Because Art of Illusion interpolates vertex positions for the in-betweens, this should look reasonably natural. | 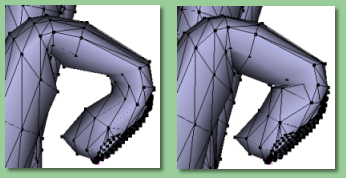 |

| Click OK to accept this. To actually set this pose to the current point in time, we now need to select Animation -> Keyframe Modified Tracks of Selected Objects . This produces a new keyframe in the Pose Track as shown on the right: | 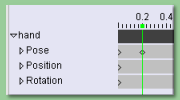 |
|
Go to time 0.2 and double-click the hand object in the Object List to display the pose dialogue. Add all
the gestures you have created to the Current Pose. This should result in a clenched hand pose as
on the right: Click on OK to accept this and then keyframe the pose track as before. Just as a little aside, move the time marker to 0.1 and double-click the hand object to display the pose dialogue again. You will see that all the gestures defined are still in the Current Pose list but that their Weights are different. This is because, of course, the digits are only part closed. The actual Weight values will depend on the type of Smoothing employed for the Pose track. Double-click on the Pose track in the score to bring up a dialogue change this. The options are Discontinuous (sudden changes in pose), Linear (linear interpolation - weights will be 0.5 for all gestures) and two types of smooth interpolation - Interpolating and Approximating. We'll stick with Linear for now but you may wish to try out either of the smoother options later. |
 |
|
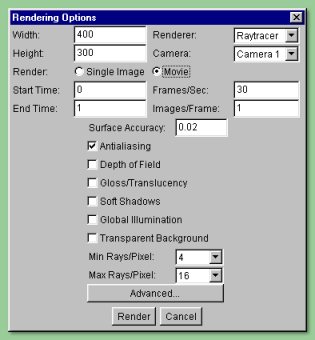
To render the animation, go to Scene -> Render Scene. In the dialogue, select the type of renderer
you want to use and the settings appropriately; an example is shown on the right: Here I am using the
raytracer with anti-aliasing on and min rays/pixel 4, max rays/pixel 16. This should give a fairly good
result. Click on 'Movie' and ensure that the Start Time is set to 0 and the End Time to 1 as this is the time range of our animation. Frames/Sec will determine how smooth animation plays. The greater the number the smoother the animation but the larger the animation file size and the longer the overall rendering time. A value of 30 is normally large enough. The Images/Frame is used if we want some motion blurring in the animation. The value entered here is the number of frames that is rendered and then averaged per frame. This adds a photorealistic effect but the rendering time is again increased. Motion blur is particularly effective for fast movement. |
 |