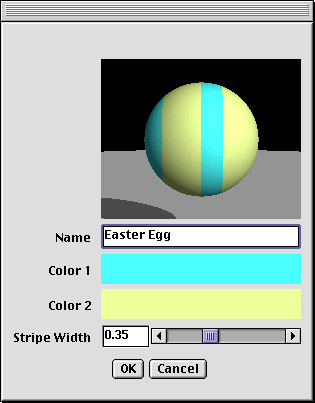
A much better solution is to make these parameters editable by the user. That way you only need a single plugin, no matter what stripe colors or widths you ever want to use. This requires a user interface for editing the parameters.
Every Texture class has an edit() method which, when called, should display a user interface and allow the user to edit the texture. Our second version of the Stripes texture adds this. The full source code is in Stripes2.java. Here is the edit() method:
public void edit(Frame fr, Scene sc)
{
  RGBColor oldColor1 = color1.duplicate(), oldColor2 = color2.duplicate();
  float oldWidth = width;
  final Panel color1Patch = color1.getSample(50, 30), color2Patch = color2.getSample(50, 30);
  final ValueSlider widthSlider = new ValueSlider(0.0, 1.0, 100, width);
  final MaterialPreviewer preview = new MaterialPreviewer(this, null, 200, 160);
  final Frame parent = fr;
  TextField nameField = new TextField(getName());
  ComponentsDialog dlg;

  color1Patch.addMouseListener(new MouseAdapter()
    {
      public void mouseClicked(MouseEvent e)
      {
        new ColorChooser(parent, "Color 1", color1);
        color1Patch.setBackground(color1.getColor());
        color1Patch.repaint();
        preview.render();
      }
    });
  color2Patch.addMouseListener(new MouseAdapter()
    {
      public void mouseClicked(MouseEvent e)
      {
        new ColorChooser(parent, "Color 2", color2);
        color2Patch.setBackground(color2.getColor());
        color2Patch.repaint();
        preview.render();
      }
    });
  widthSlider.addAdjustmentListener(new AdjustmentListener()
    {
      public void adjustmentValueChanged(AdjustmentEvent e)
      {
        width = (float) widthSlider.getValue();
        preview.render();
      }
    });
  dlg = new ComponentsDialog(parent, getName(),
      new Component [] {preview, nameField, color1Patch, color2Patch, widthSlider},
      new String [] {"", "Name", "Color 1", "Color 2", "Stripe Width"});
  if (!dlg.clickedOk())
    {
      color1.copy(oldColor1);
      color2.copy(oldColor2);
      width = oldWidth;
    }
  else
    setName(nameField.getText());
}
This method is somewhat complicated, but surprisingly short given what it does. As you can
see, Art of Illusion provides many classes especially designed to make it easy to create
simple user interfaces like this one. These classes are described in chapter 6. For the
moment, don't worry too much about them. You should still be able to get a reasonable sense
of how this method works. Here is what the editing window look like:

We are not quite done yet. In the previous chapter, things were simple. Every Stripes1 object was identical to every other one. Not any more. Every Stripes2 object is potentially unique, and that means that when a scene involving a Stripes2 texture is saved to disk, the parameter values need to get saved as well. Every Texture subclass must provide routines for loading and saving itself. Here are the implementations of them for Stripes2:
public Stripes2(DataInputStream in, Scene theScene) throws IOException, InvalidObjectException
{
  setName(in.readUTF());
  color1 = new RGBColor(in);
  color2 = new RGBColor(in);
  width = in.readFloat();
}

public void writeToFile(DataOutputStream out, Scene theScene) throws IOException
{
  out.writeUTF(getName());
  color1.writeToFile(out);
  color2.writeToFile(out);
  out.writeFloat(width);
}
writeToFile() saves all of the texture's variable parameters (including its name) to
a DataOutputStream. This is matched by a constructor which reads the parameter values
from a DataInputStream. You can save the parameters in any format you want, so long as
you make sure the two methods are compatible with each other.
Finally, every texture must provide a duplicate() method which creates an exact copy of itself. Here is the implementation of it for Stripes2:
public Texture duplicate()
{
  Stripes2 s = new Stripes2();

  s.color1.copy(color1);
  s.color2.copy(color2);
  s.width = width;
  return s;
}